Hot Chocolate Bombs are delicious, easy to make, and perfect for gifting to your favorite people! We’re skipping the cocoa powder filling though and using actual chocolate—so much better! And I designed a printable tag that you can use for the perfect packaging. It works whether you’re giving them to kids to get chocolate wasted on or if you’re including a mini bottle of booze for adults to spike their drink with!
HOT CHOCOLATE VS. HOT COCOA
Did you know that there’s actually a difference between hot chocolate and hot cocoa? Whaaat? It’s true, I kid you not. Even though the two terms are often used interchangeably they’re technically not the same thing.
Hot cocoa is a powdered consistency that’s made of cocoa powder, sugar, and milk powder, and is usually sweeter, thinner, and lighter in chocolate flavor. Whereas actual hot chocolate is made by melting real chocolate that’s finely shaved or chopped, resulting in a thicker drink that’s stronger in chocolate flavor and usually less sweet.
Crazy, right? I was taught to call the cringe-worthy, pre-package, lumpy hot cocoa mix, of my childhood, “hot chocolate”, and I was not at all a fan of the taste so I had blinders on to anything “hot chocolate” related most of my life. But real hot chocolate is friggin’ delicious!!

HOW YOU CAN MAKE HOT CHOCOLATE BOMBS
First, you need good quality chocolate. Ideally, you want to use couverture chocolate and temper it. Tempered chocolate is shiny, won’t melt on your fingers, and snaps when broken. Whereas untempered chocolate is dull, melts easily when touched, and has zero snap.
I used fancier chocolate for my final version because it’s dairy-free, but when I was testing I just used Aldi’s dark chocolate chips and they worked pretty well. Aldi’s chocolate chips are surprisingly phenomenal and pretty clean ingredient-wise if you can do dairy.
A lot of people are intimidated by having to temper chocolate, I personally don’t find it that difficult. Low and slow over a double boiler and using the “seeding method“, if need be, is what works for me with the type of chocolate I’ve used.
If tempering chocolate isn’t your thing you can use melting wafers instead, however, I feel that they definitely do not taste as good as real chocolate does.
Second, you’ll need a food-grade silicone mold to make the shells. While you can certainly choose different shapes for different holidays or occasions, I found that the sphere mold is the best option for beginners, as well as for my fellow neurodiverents that may lack patience like myself.
For one sphere mold, I use a 1/2 cup of chocolate, which makes six shells and gives you three finished bombs. If you plan to use two silicone sphere molds at the same time, you would melt 1 cup of chocolate, which will give you twelve shells and six finished bombs. Melting the chocolate a 1/2 cup at a time will work better though if you live in colder climates, as the chocolate may start to set more quickly.
Third, determine how you’ll spread the melted chocolate in the mold. Some people can do it with just a spoon or a spatula, which I’ve tried but it wasn’t very ADHD friendly. What works best for me is using a decorating brush, I feel that it gives better control than a spoon or spatula does.
Fourth, you need the ingredients to make the filling. This is definitely customizable based on your preferences, but for the base filling, you will need: dark chocolate, semi-sweet chocolate, vanilla powder, espresso powder, salt, and marshmallows.
WHAT I USED:
- Dark Chocolate Chips
- Semi-Sweet Chocolate Chips
- Vanilla Powder
- Expresso Powder
- Marshmallows
- Bomb Silicone Mold
- Food Decorating Brushes
DON’T WANT TO MAKE YOUR OWN?
If you don’t have the time or just don’t want to make your own, no worries. There are MANY options available for buying bombs that are already made online, just search “hot chocolate bombs near me“. I would recommend getting a homemade bomb from a local baker or off of Etsy from a reputable seller.
However, if you want to pick them up locally or have them delivered quickly, here are a few options you could check out:
- BJ’s Wholesale – Chocolate with marshmallows
- Sam’s Club – Beligan Chocolate with marshmallows
- Michael’s – Chocolate with marshmallows
- Target – Raspberry White Chocolate with marshamallows and sprinkles
- Amazon – Chocolate with marshamallows
***Please note that I have NOT tried any of these premade bombs, so I can not vouch for whether the flavor is good or not.

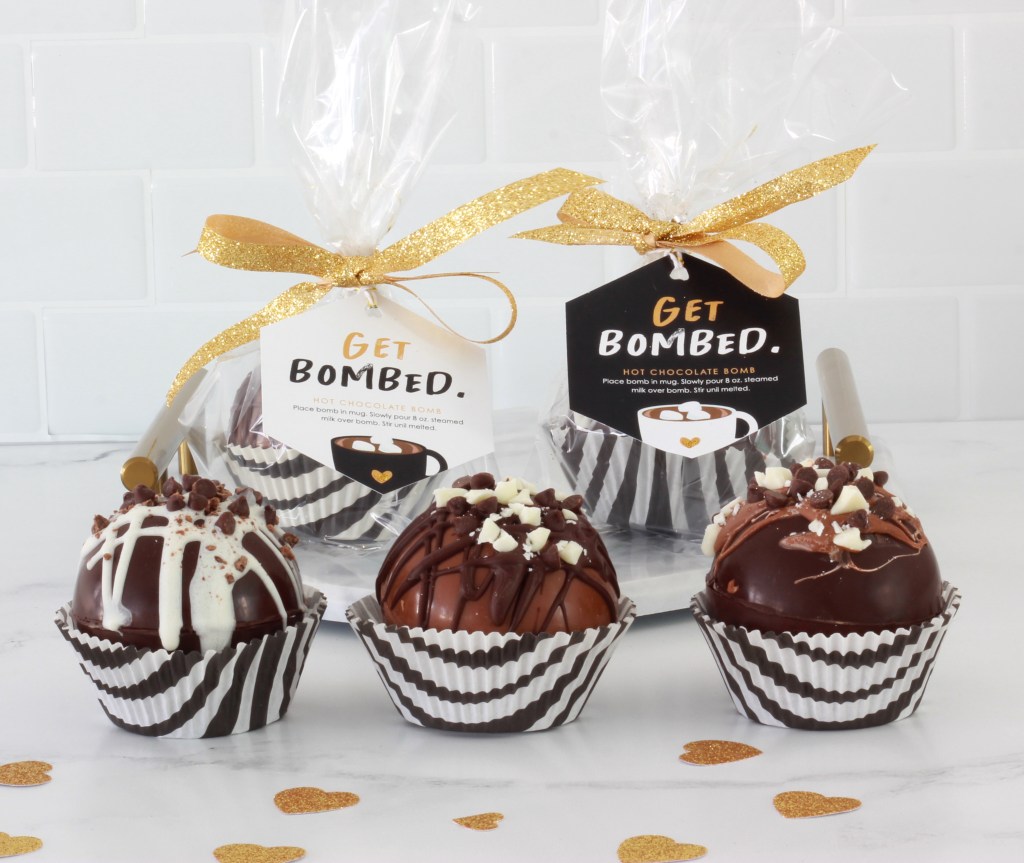
PACKAGING FOR BOMBS
Next, you’ll need to decide how you want to package the bombs.
Cupcakes liners work great for holding the bombs. I used zebra print ones, they’re definitely cheaper at Party City but Amazon wins for convince and free shipping.
To keep things simple or if you’re planning to pass them out to different people on Valentine’s Day, I recommend placing the bomb in a tall, cellophane treat bag. You could also package them in cupcakes boxes too.
Treat bags usually come with twist ties to close the bags but I like to add ribbon as well. And, like I always say, glitter ribbon is messy but (almost) always worth it! 😉
To finish it off, I designed a tag with directions that can be attached to your bombs. You can download it to use below!
I used gold baker’s twine, from Target, to attach the tags, but I’m not super crazy about their baker’s twine because the gold starts to come unraveled the second it’s cut anywhere. The solution I found to this is to tie little knots at each end of a cut.

MAKE BOMB GIFTS
You could also place a packaged bomb into a glass mug as a super cute gift! Glass mugs are what I like to use when gifting bombs so that the experience of the bomb melting can be fully enjoyed by all who are present. I also recommend that glass mugs be double-walled so that they are less fragile.

If you want to take your gift a step further, I gotchu covered. All you need is a gift box, cute mugs, crinkle paper shreds or tissue paper, spoons, and optional mini bottles of booze. Again, double-walled glass mugs are what I like to use when gifting bombs.
WHAT I USED:
- Cupcake Liners
- Clear treat bags
- Gold Glitter Ribbon
- Gold Baker’s Twine
- Gift Box
- Set of 4 Glass Mugs
- Leaf spoons
- Bear Mug
PRINTABLE TAG DOWNLOADS
I wanted to keep it neutral colors but feel free to bring color in with red or pink ribbon if you’re using them for Valentine’s Day. I also did two versions, one with the words “Get Bombed” slightly faded and one with them solid.
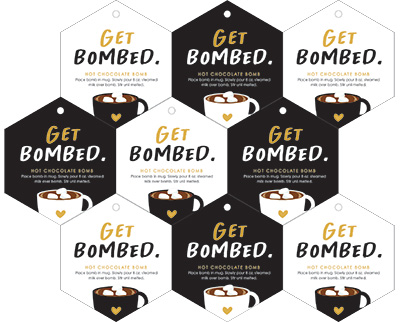
Download Get Bombed Printable Tags
Simply download the tag files below, print them on heavy cardstock, cut them out, punch a hole at the top and attach with baker’s twine or ribbon!

The Best Hot Chocolate Bomb

Hot Chocolate Bombs are delicious, easy to make, and perfect for gifting to your fav people! We’re skipping the cocoa powder filling though and using actual chocolate—so much better!
Chocolate Bomb Shell
- 1/2 cup dark chocolate*
Chocolate Bomb Filling
- 2 ounces dark chocolate*
- 3 ounces semi-sweet or milk chocolate
- 1/2 teaspoon expresso powder (optional)
- 1/4 teaspoon vanilla powder
- 1/8 teaspoon salt
Chocolate Bomb Shell
Using the double boiler method, melt 1/2 cup of dark chocolate on low heat. To temper the chocolate properly, make sure to keep the temperature below 97 degrees.
Once the chocolate is melted, stir in the refined coconut oil.
Add a half tablespoon of chocolate to each sphere and spread evenly.
Place in fridge for five to ten minutes or until chocolate is set.
Then repeat the process, adding only about a half tablespoon of chocolate to each sphere this time. Focus mainly on making sure the rim at the top is thicker than the rest of the sphere.
Chocolate Bomb Filling
Add all the ingredients to a food processor and pulse until chocolate is finely chopped.
Assembling the Bombs
On a gently warm plate or baking pan, twist each sphere until the edge is smooth.
Fill three of the spheres with 3-4 tablespoons of the filling mixture and as many marshmallows as you would like.
Then press together the tops and bottoms of the spheres.
Decorate the tops with additional melted chocolate and sprinkle with mini chocolate chips and or chopped chocolate or candy.
Let sit until chocolate has set, then store in an air-tight container or package each bomb individually!
*Ideally you want to use a chocolate that is 60% cacao or more.
Seriously how bomb are these for Valentine’s gift!? Ya see what I did there? 😉
If you make this recipe for Hot Chocolate Boms and or use the printable tags, be sure to come back and leave a comment and let me know how you liked them, and don’t forget to tag me on Instagram! I love hearing from you and seeing the photos of the recipes and creations that you’ve made!

Leave a comment